May 16, 2018 | InBrief
A 10-step guide to handling even the most complex Salesforce Org merges
A 10-step guide to handling even the most complex Salesforce Org merges
There’s no denying that the last few years have seen a flurry of mergers and acquisitions. With $2.1 trillion spent on acquisitions in 2017 and close to 7,000 completed M&A deals already for 2018, it’s clear that companies are combining, splitting, and re-combining at rates faster than ever before. All that deal-making can be exciting, but once the ink is dry, these newly merged entities are faced with the challenge of integrating various individual technological back ends that make up the new whole. This level of M&A activity, combined with Salesforce’s meteoric rise in market share, has made the following situation more and more common: following a transaction, the new business finds itself with two complex Salesforce instances that need to be merged into one org. To be clear, we’re not discussing two out-of-the-box Sales Cloud implementations that just need data extracted from one and loaded into the other. We’re talking about two highly-customized instances with a lot of business process automation, workflows, custom objects, apex code, Visualforce pages, third-party apps, integrations, and more. These are orgs with hundreds or thousands of users – implementations that have been built out over the course of many years. Sound daunting? This step-by-step guide, focused on a tactic known as Lift and Shift, will help you avoid some of the pitfalls that can beset these complex projects and execute your org merge as smoothly and efficiently as possible.
1. Preparation & Strategy
While it may seem logical to combine an org merge with general business process consolidation and streamlining, trying to do both at once is a recipe for disaster. Highly customized Salesforce instances have intricate business processes hardwired into them and trying to redesign two sprawling sets of configurations and customizations in the middle of a migration is bound to lead to some brutal short-circuits. In a Lift and Shift, we assume that the first goal is to have all business processes functioning as they are today, but in one single consolidated instance. The first step is to make a judgment as to which org will be the “Surviving” or “Target” org (this might be the larger org, the more complex org, or the org owned by the acquiring company) and which will be the “Retiring” or “Source” org (generally the smaller org, the simpler org, or the org owned by the acquired company). From there, we seek to ‘Lift’ the data, configuration, and customizations from the retiring org, and ‘Shift’ it over into the surviving org. From there, we go through a rigorous process to minimally tailor the configuration and customizations from both orgs so that they can coexist in a single environment without interfering with one another. Once the Lift and Shift is complete, we can proceed with business process consolidation and optimization, which is infinitely simpler now that both businesses are working out of a single org. Something to note when performing metadata migration: it is highly recommended to use the Force.com Migration Tool. Tools such as unmanaged packages don’t give you the granularity needed to do the subtle tailoring you’ll need. For data migration, you can use your preferred Salesforce data loader. We like Jitterbit Cloud Data Loader because it gives you the ability to save and repeat processes rather than going through a wizard each time.
2. Process Review / Housecleaning
Process Review involves familiarizing yourself with each business process that you are moving over to your surviving org. A good analogy that I like to use is moving to a new house. You may decide to bring all your favorite things from certain rooms, such as the bedroom, but other rooms may be filled with junk, like the attic – why bring all that stuff? The same applies to business processes and data – as your CRM evolved over time, it likely contains a lot that you do not want to bring over in the Lift and Shift. It’s important to identify and prioritize. We complete this process review exercise to achieve two goals:
-
For each process area, identify all the objects that are used in that process.
-
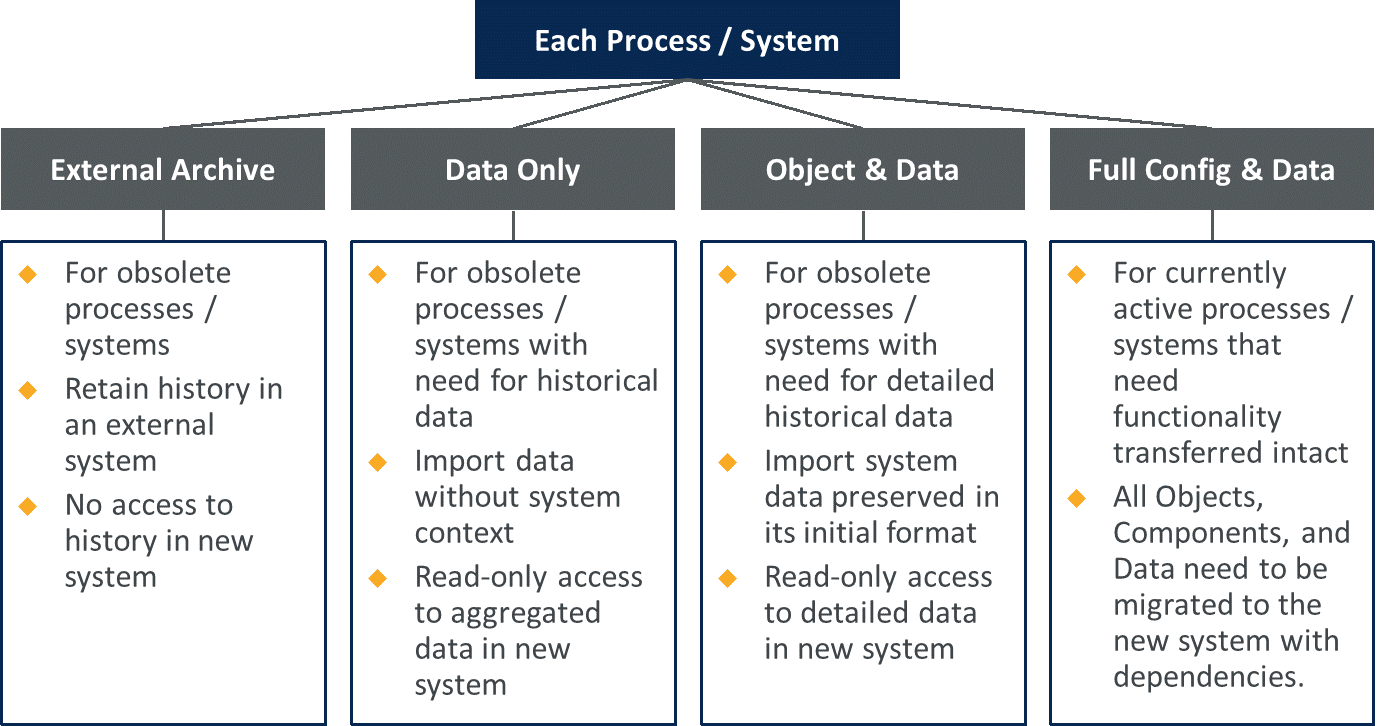
Once you identify the objects, we prioritize which standard and custom objects will come over in the move and the priority of those objects. Each object should be tagged with a recommendation, based on the following framework:
To complete these steps, you will want to understand your core business processes and map each of those processes in some detail. Next, you can list out all the objects that are relevant for each business process. Finally, you prioritize your decision on what to do with those objects; this step is foundational to narrow the scope objects you are going to be moving over. When you go through this process, you will likely come across a lot of potential cleanup items related to the objects that you have prioritized. If you have the time, you can clean up your org a bit before starting the org merge – this can save you time later since it’s less clutter that you are moving over. Some good cleanup candidates include removing unused fields, page layouts, workflows, process builders, etc. There are some good tools to find unused fields such as Field Trip. We also recommend doing an inventory of managed packages and marking down any that you may want to remove since those can create a lot of noise when you get to the next step.
3. System Review
Systems Review involves taking an inventory of all configurations and data on the objects that you identified in step two. Since you have narrowed the scope to just the objects that you care about, this step is now much more focused. However, it is generally the most time intensive and complex. Once you have identified everything in a spreadsheet, create a column for “Next Action” detailing what you are going to do with that specific item. Examples include: uninstall, delete, migrate, and rebuild. You will most likely need to engage business stakeholders in these systems decisions. This process can take weeks of analysis, but it is better to spend the time documenting and discussing each item so that you understand dependencies and prioritize.
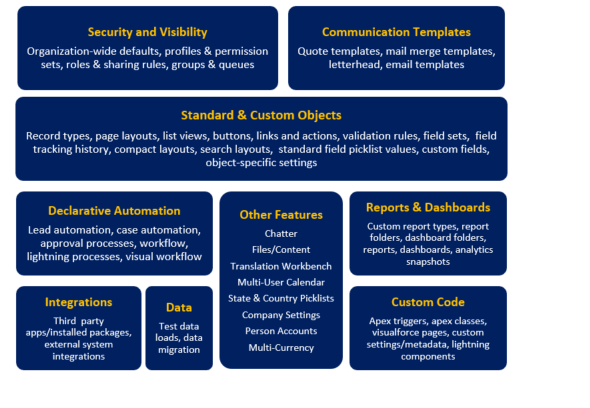
Here are examples of things to take a detailed inventory of:
4. Package Creation
Package creation involves creating your xml package using the Force.com Migration Tool, or something similar. Some items will have to be manually built in the new instance. Make sure to create a detailed deployment checklist that includes manual pre-deployment and post-deployment steps. Profiles can be particularly hard to deploy because there are limitations on what specific parts of the profile’s permissions can be deployed. Because of this, you need to make sure that you review them in the surviving environment after deployment to ensure that all of permissions have carried over as you intended.
5. Merge metadata into Merge sandbox (Dev)
Once you have your xml package and your manual deployment steps documented you can go through the process of executing the deployment process to merge the metadata into a developer sandbox. This can involve lots of troubleshooting but is the same process as a normal deployment. However, you must use a tool such as Force.com Migration (cannot use change sets). Once you get a clean run, you can claim that your org merge is almost ready for User Acceptance Testing (UAT).
6. Move into UAT sandbox (partial / full) and Test Data Loads
Now that you have successfully completed one full migration of all the metadata into your surviving org, you can go through the regular steps of deploying the changes from the developer sandbox to a UAT sandbox within the surviving org. The key steps here are performing test data loads and then having users test out the functionality. One power user trick is to set up a process to be able to submit all the data loads with the click of a button, using an ETL tool such as Informatica or Jitterbit. On one recent project, we used Jitterbit to extract the correct data objects from the retiring org and insert them in the surviving org. Data must be loaded in a specific order to maintain relationships. Rather than using VLOOKUP’s in Excel to maintain relationships between orgs, we recommend creating an External ID field on each object being migrated and then creating a workflow that populates it with the Org Id and Record Id. This allows the records to be mapped to the appropriate parent in the new org. Salesforce provides an object hierarchy on the order that data should be loaded into standard objects.
7. User Acceptance Testing (UAT)
UAT is an important phase because the perspective of the end users is obtained. The objective of UAT for an org merge is to identify if any of the agreed upon requirements were not met or if any of the configuration is not functioning. It is typically done through an end-to-end walk through of UAT Scripts based on client approved requirements. During UAT, configured functionality is validated and any errors that were not caught during the earlier phases of testing get flagged and addressed.
8. Move into Production and Final Data Loads
Your production deployment is similar to your UAT deployment. Just follow the same steps and make sure all the data is loaded. To make this final push, you will need to define a blackout period when no changes can be made in the surviving org and users are locked out of the retiring org. We prefer to do this late on a Friday or over the weekend when most users won’t be using the system.
9. Go Live
As you approach Go Live, you will have to communicate to the users based on your overarching communication strategy. Users will need to be provisioned and given password resets so they are activated in the surviving org. You will also want to deactivate them in the retiring org but should always keep one admin user license active as back up. You also may need to do delta data loads if you had any incremental data to load into the surviving org.
10. Support
No one likes being left in the dust – so don’t forget the last, but crucial part of a successful merge project: support. Oftentimes, this takes the form of train the trainer. This involves creating training materials that will help individuals train end users to use the new Salesforce org functionality. When a Lift and Shift is done correctly, there should be very little retraining, but you may have had to reconcile some differences in the orgs that led to small adjustments. For larger and more complex integrations, organizational change management may be required to ensure adoption and success using the new tool. While merging two or more different Salesforce instances into one cohesive org is a large undertaking, pacing it out following these 10 steps will help demystify the process and keep your team on track. Happy merging!